第二章:常见布局的使用
View 视图
- 所有的
UI元素都是通过View与ViewGroup构建的,对于一个Android应用的用户界面来说,ViewGroup作为容器显示界面中的控件,它可以包含普通的View控件,也可以包含ViewGroup
界面布局编写方式
XML 布局【推荐】
- 将界面布局的代码和
Java代码隔离,使程序的结构更加清晰
Java 布局
- 在
.java文件中new出布局和控件的对象,将创建的View控件添加到ViewGroup进而实现View控件在布局界面中显示
常见界面布局
五种常用布局
- 线性布局:以水平或垂直方向排列
- 相对布局:通过相对定位排列
- 帧布局:开辟空白区域,帧里的控件(层)叠加
- 表格布局:表格形式排列
- 约束布局:可视化的方式编写布局
布局的通用属性
| 属性名称 | 功能描述 |
|---|---|
| android:id | 设置布局的标识 |
| android:layout_width | 设置布局的宽度 |
| android:layout_height | 设置布局的高度 |
| android:background | 设置布局的背景 |
| android:layout_margin | 设置当前布局与屏幕边界或与周围控件的距离 |
| android:padding | 设置当前布局与该布局中控件的距离 |
layout_width 和 layout_width
match_parent:适配父容器的宽高wrap_content:适配内容的宽高100dp:具体值
margin 和 padding
将页面设计看成作画。屏幕则是纸张,
margin是控制边界线到纸张的间距,padding控制图画到边界线的间距未设置布局的
margin和padding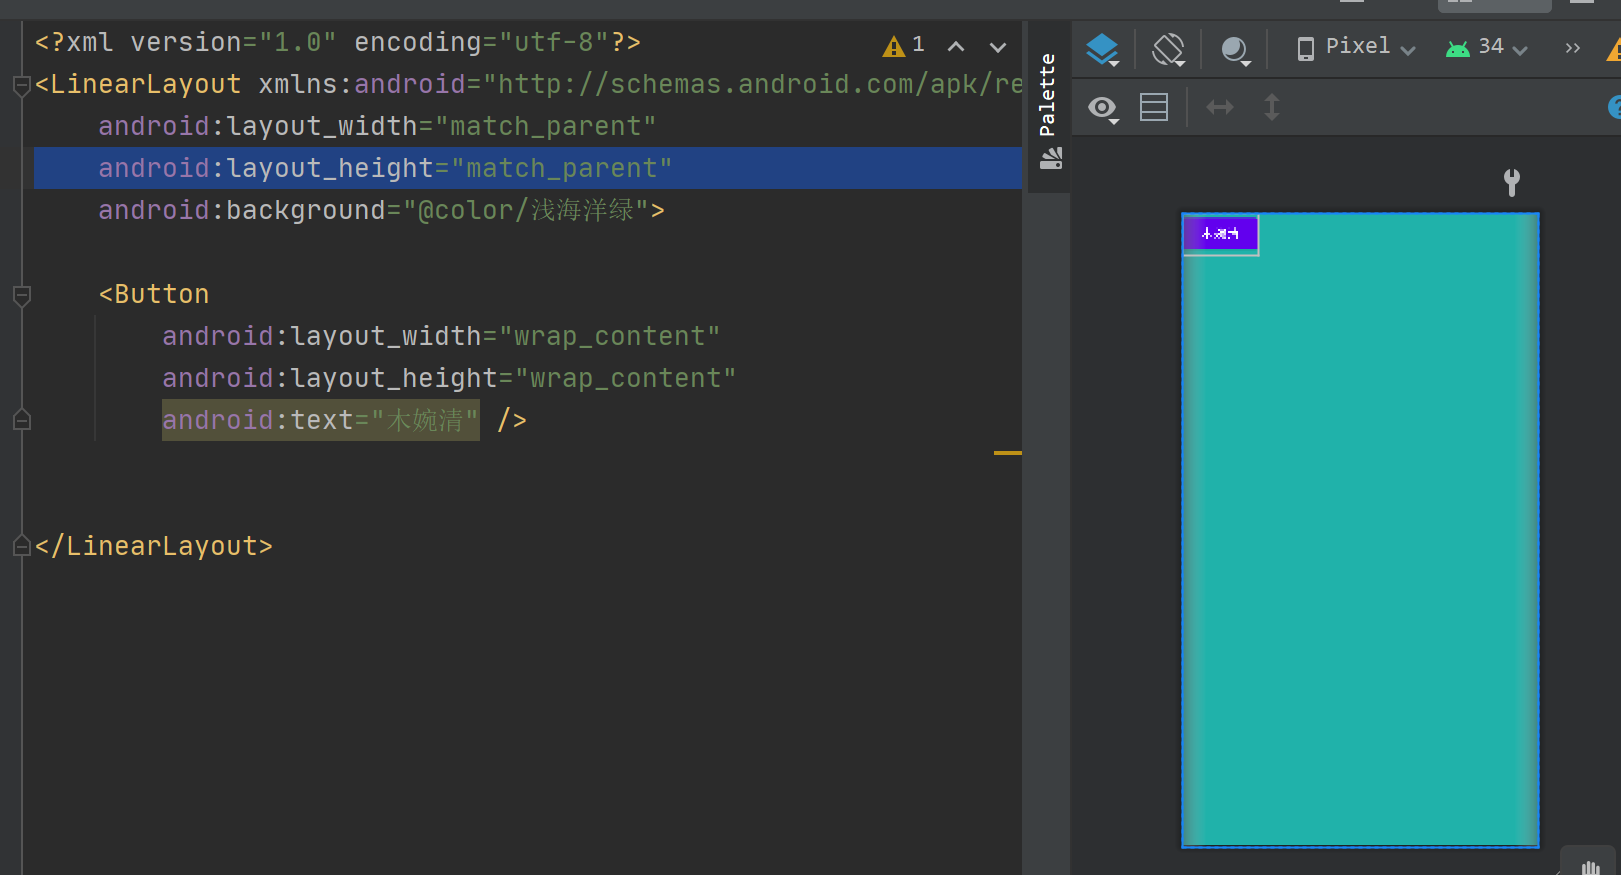
已设置布局的
margin和padding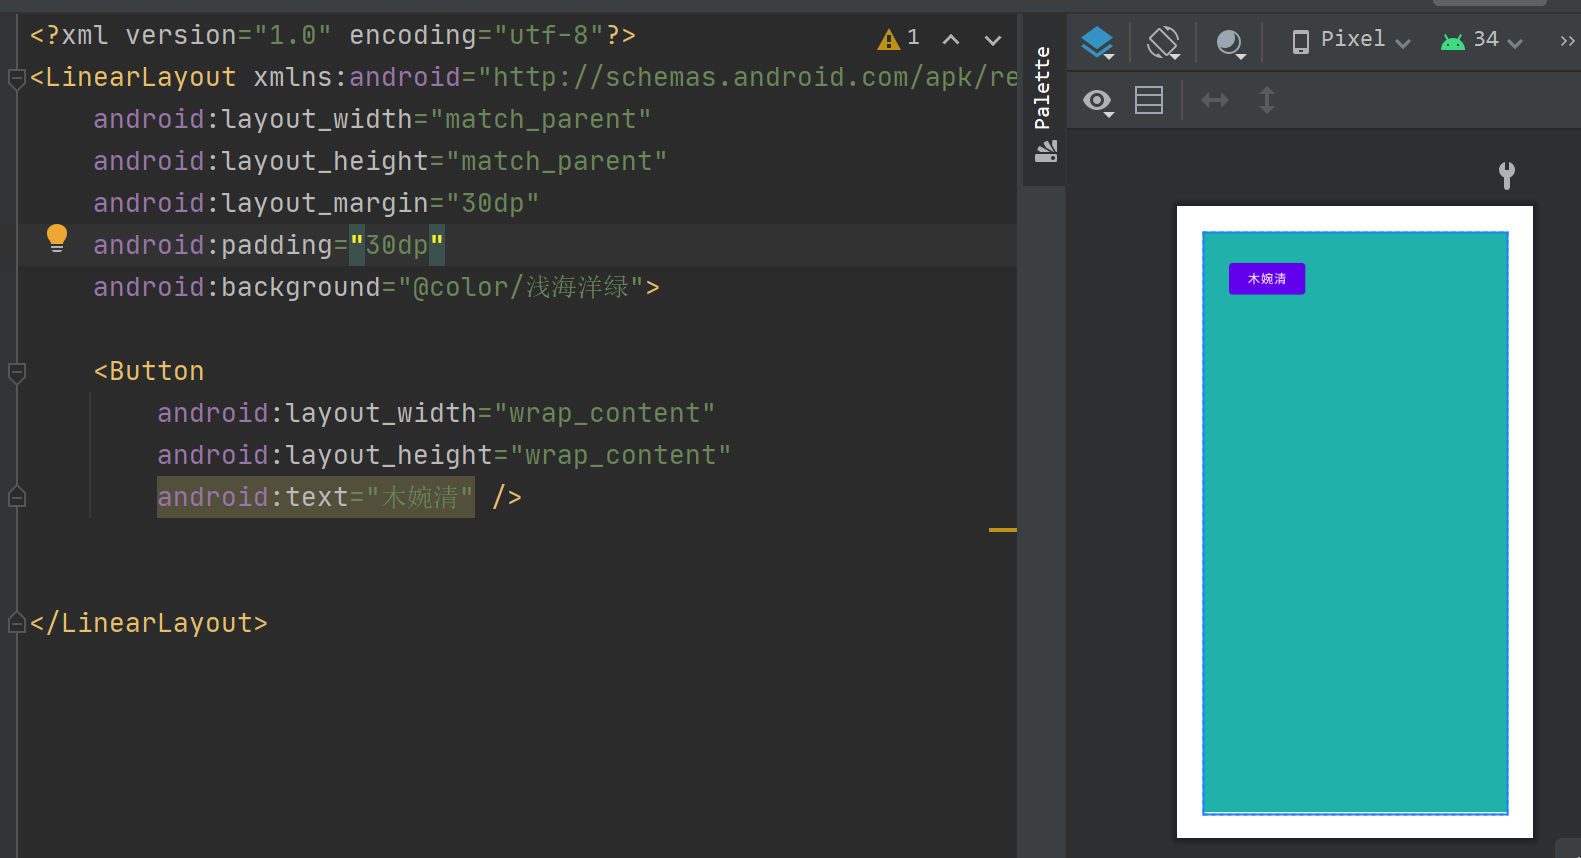
线性布局
- 线性布局(
LinearLayout)主要以水平或垂直方式来显示界面中的控件。当控件水平排列时,显示顺序依次为从左到右,当控件垂直排列时,显示顺序依次为从上到下
创建线性布局的 .xml 文件
layout->New->XML->Layout XML File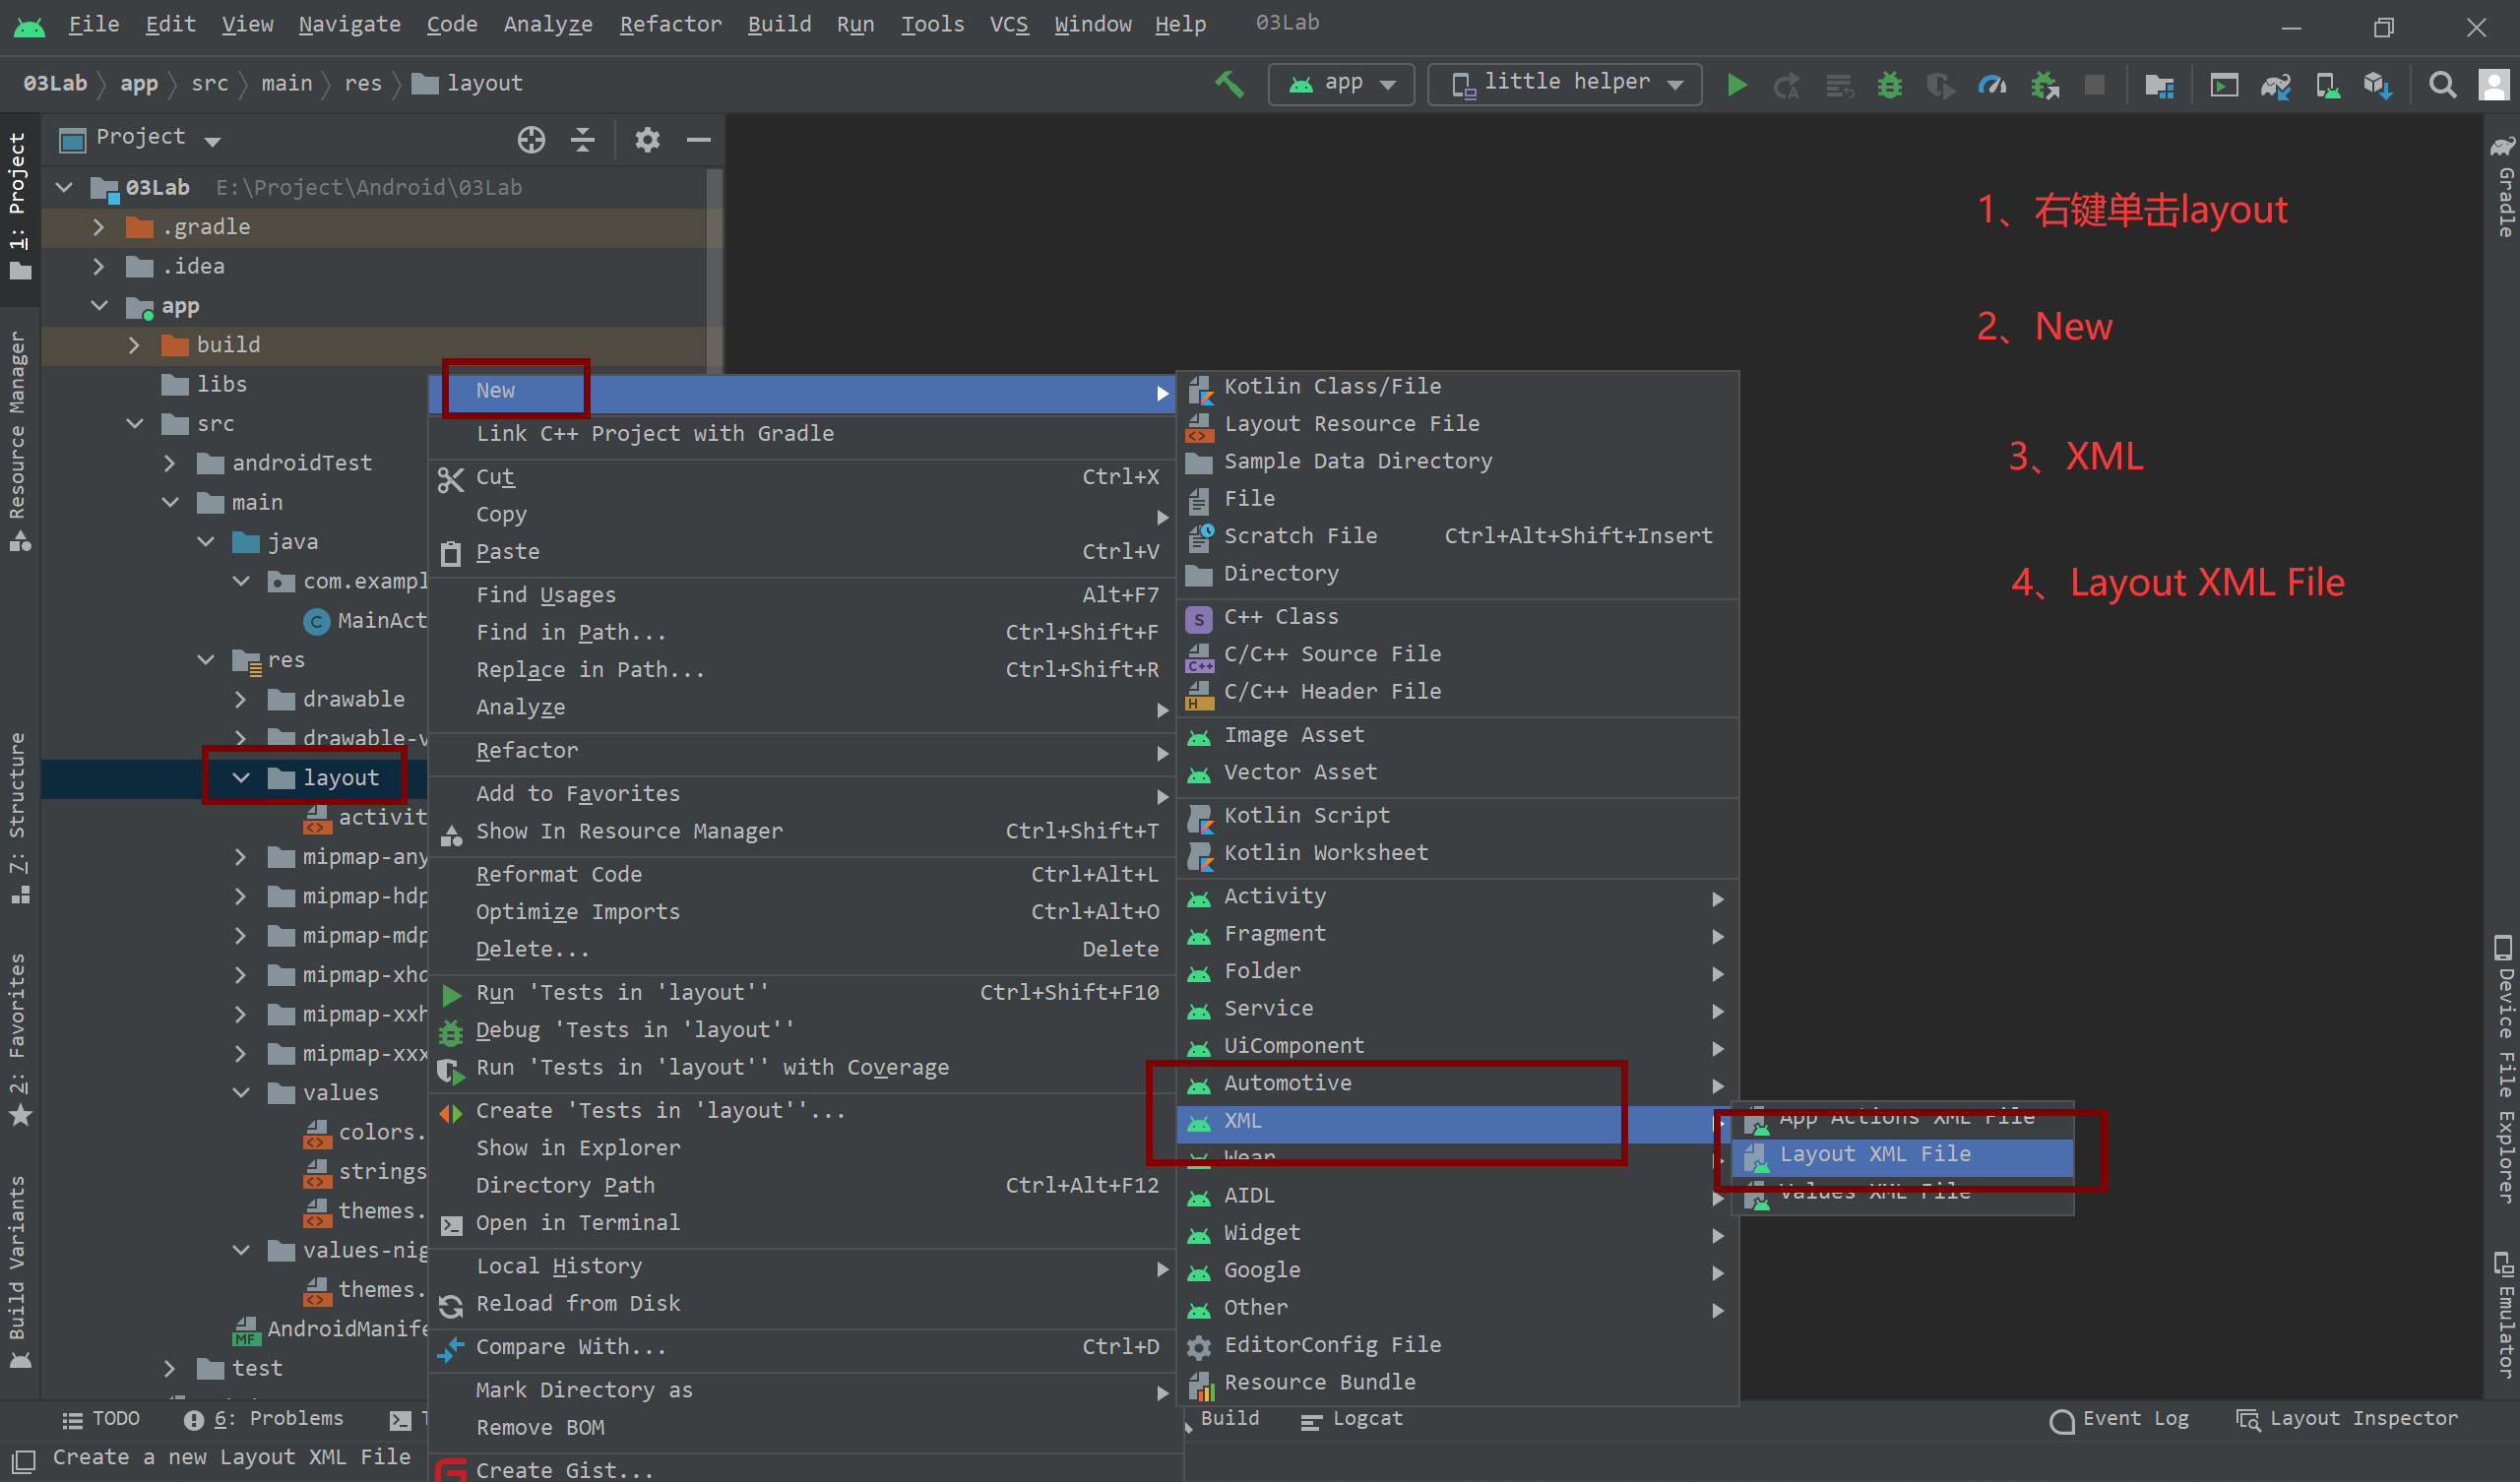
为文件取名,选择
LinearLayout并点击Finish完成线性布局文件的创建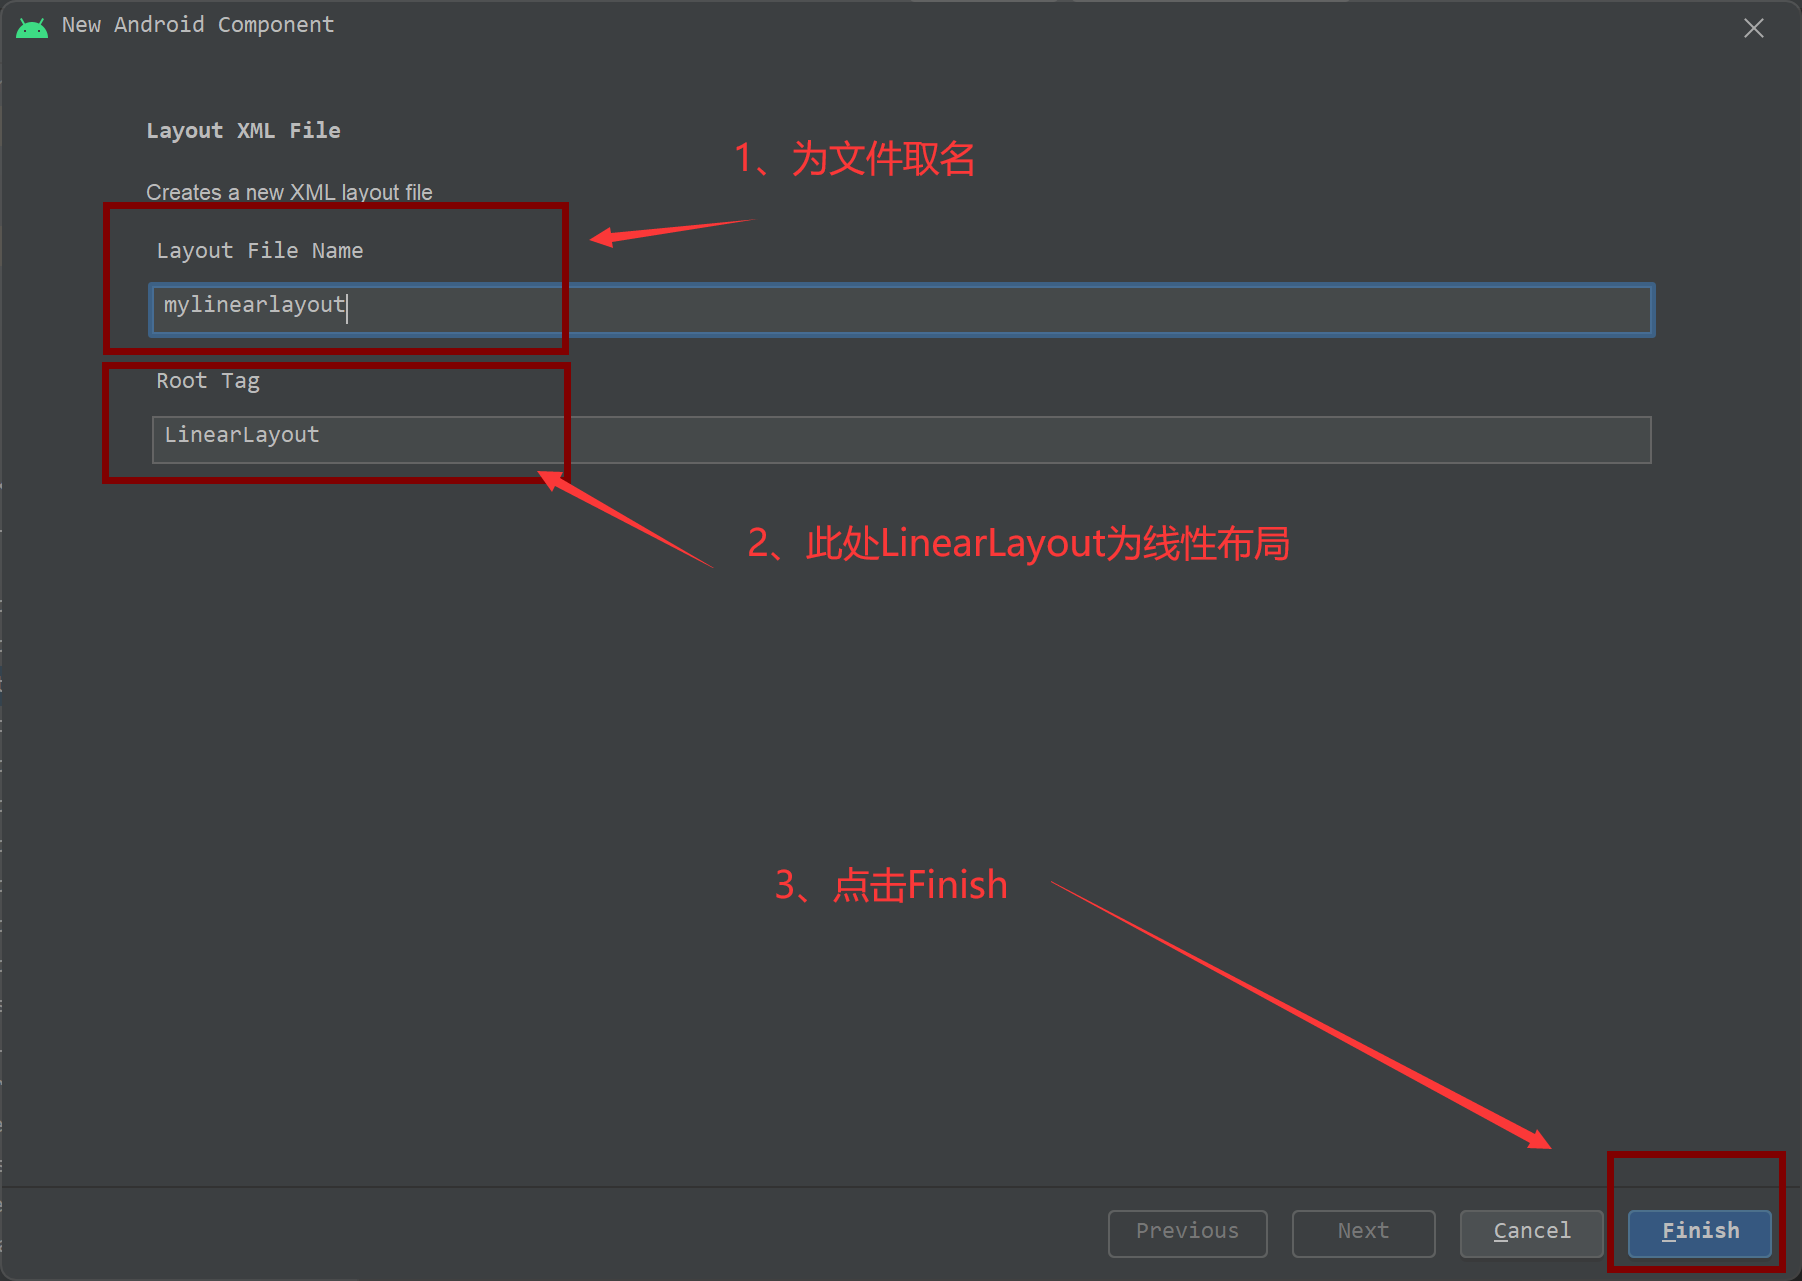
<?xml version="1.0" encoding="utf-8"?>
<LinearLayout xmlns:android="http://schemas.android.com/apk/res/android"
    android:layout_width="match_parent"
    android:layout_height="match_parent">

</LinearLayout>
线性布局详解
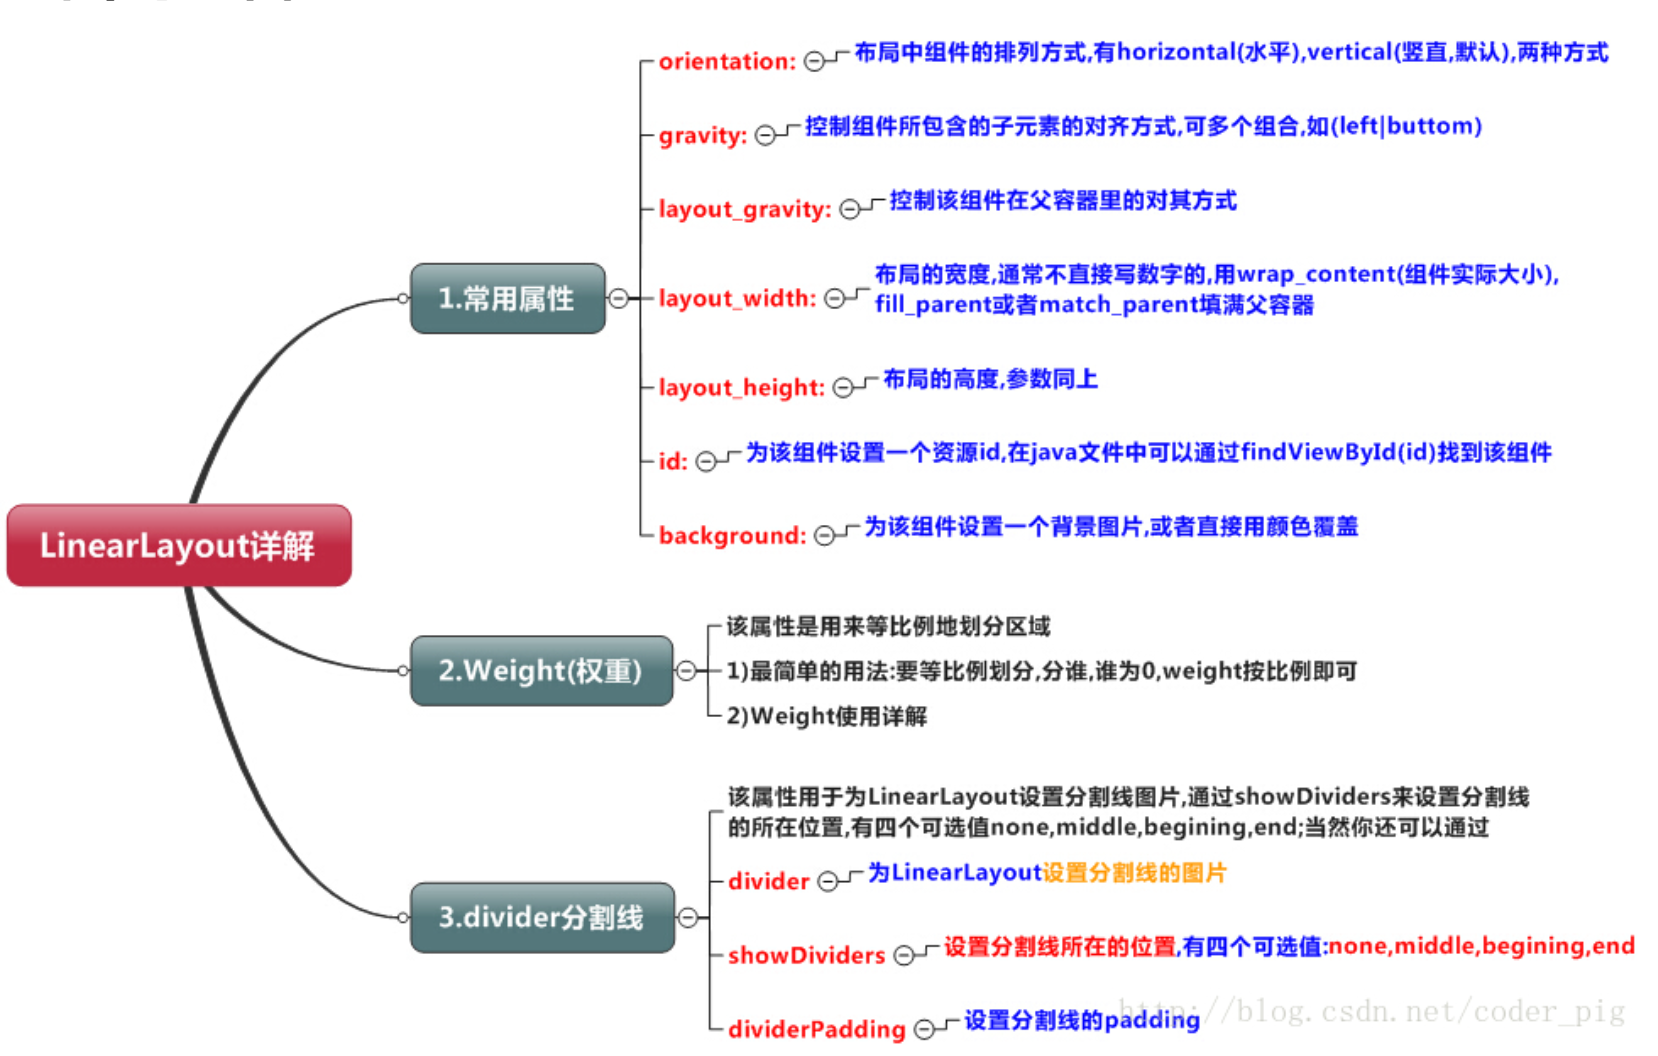
使用 android:layout_weight 时需把 android:layout_width 设置为 0dp
相对布局
- 相对布局(
RelativeLayout)是通过相对定位的方式指定子控件位置,即以其他控件或父容器为参照物,摆放控件位置
创建相对布局 .xml 文件的流程同上,只需将 Root Tag 为 RelativeLayout
<?xml version="1.0" encoding="utf-8"?>
<RelativeLayout xmlns:android="http://schemas.android.com/apk/res/android"
    android:layout_width="match_parent"
    android:layout_height="match_parent">

</RelativeLayout>
相对布局详解
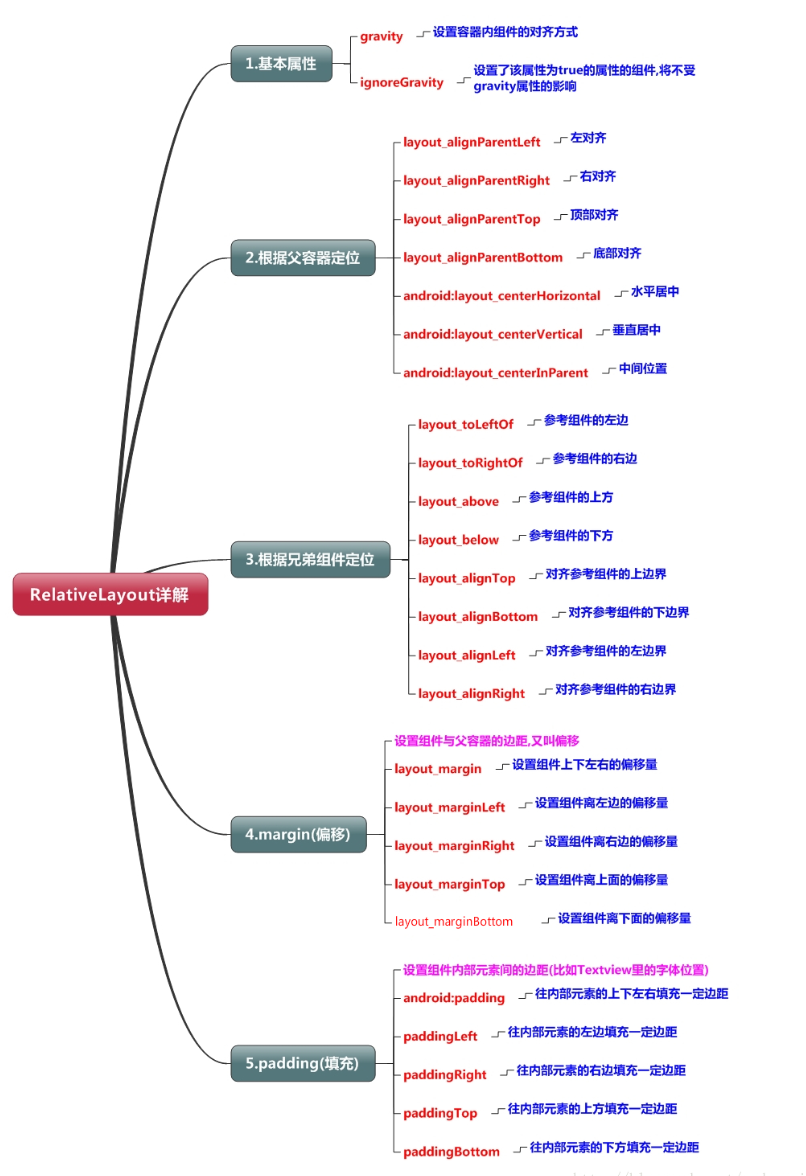
注意
RelativeLayout 中的控件无法拖动
帧布局
- 帧布局(
FrameLayout)用于在屏幕上创建一块空白区域,添加到该区域中的每一个子控件占一帧,这些帧会一个一个叠加在一起,后加入的控件会叠加在上一个控件上层
创建帧布局 .xml 文件的流程同上,只需将 Root Tag 为 RelativeLayout
<?xml version="1.0" encoding="utf-8"?>
<FrameLayout xmlns:android="http://schemas.android.com/apk/res/android"
    android:layout_width="match_parent"
    android:layout_height="match_parent">

</FrameLayout>
帧布局详解
所有控件都默认显示在屏幕左上角
常用属性:【在 FrameLayout 中进行编辑】
- **android:foreground:**设置改帧布局容器的前景图像
- **android:foregroundGravity:**设置前景图像显示的位置
表格布局
- 表格布局(
TableLayout)采用行、列的形式来管理控件,它不需要明确声明包含多少行、多少列,而是通过在 TableLayout 布局中添加 TableRow 布局来控制表格的行数,通过TableRow 布局中添加控件来控制表格的列数
创建表格布局 .xml 文件的流程同上,只需将 Root Tag 为 TableLayout
<?xml version="1.0" encoding="utf-8"?>
<TableLayout xmlns:android="http://schemas.android.com/apk/res/android"
    android:layout_width="match_parent"
    android:layout_height="match_parent">

    <TableRow>


    </TableRow>
</TableLayout>
表格布局详解
确定行数与列数
- 如果我们直接往
TableLayout中添加组件的话,那么这个组件将占满一行 - 如果我们想一行上有多个组件的话,就要添加一个
TableRow的容器,把组件都丢到里面 tablerow中的组件个数就决定了该行有多少列,而列的宽度由该列中最宽的单元格决定tablerow的layout_width属性,默认是match_parent的,我们自己设置成其他的值也不会生效!!! 但是layout_height默认是wrap_content的,我们却可以自己设置大小- 整个表格布局的宽度取决于父容器的宽度(占满父容器本身)
- 有多少行就要自己数啦,一个 tablerow 一行,一个单独的组件也一行!多少列则是看 tableRow 中的组件个数,组件最多的就是 TableLayout 的列数
- 如果我们直接往
表格布局属性【在 TableLayout 标签中进行编辑】
- android:collapseColumns:设置需要被隐藏的列的序号
- android:shrinkColumns:设置允许被收缩的列的列序号
- android:stretchColumns:设置运行被拉伸的列的列序号
表格布局控件属性【在控件中进行编辑】
- android:layout_column:设置该单元显示的位置, 0 为默认下标
- android:layout_span:设置该单元格占据几行,默认为 1 行
约束布局
- 约束布局(
ConstraintLayout)合适使用可视化的方式编写界面布局
创建约束布局 .xml 文件的流程同上,只需将 Root Tag 为 RelativeLayout
<?xml version="1.0" encoding="utf-8"?>
<androidx.constraintlayout.widget.ConstraintLayout xmlns:android="http://schemas.android.com/apk/res/android"
    android:layout_width="match_parent"
    android:layout_height="match_parent">

</androidx.constraintlayout.widget.ConstraintLayout>